Stripe - Setting up Webhook and Test/Public Keys
Stripe Integration Setup for Ultimate Member
To begin integrating Stripe with Ultimate Member, you’ll need to configure your API keys and generate a Webhook URL.
Accessing API Keys in the Stripe Dashboard
Follow the steps below to locate your API keys:
- Log in to your Stripe Dashboard: https://dashboard.stripe.com/
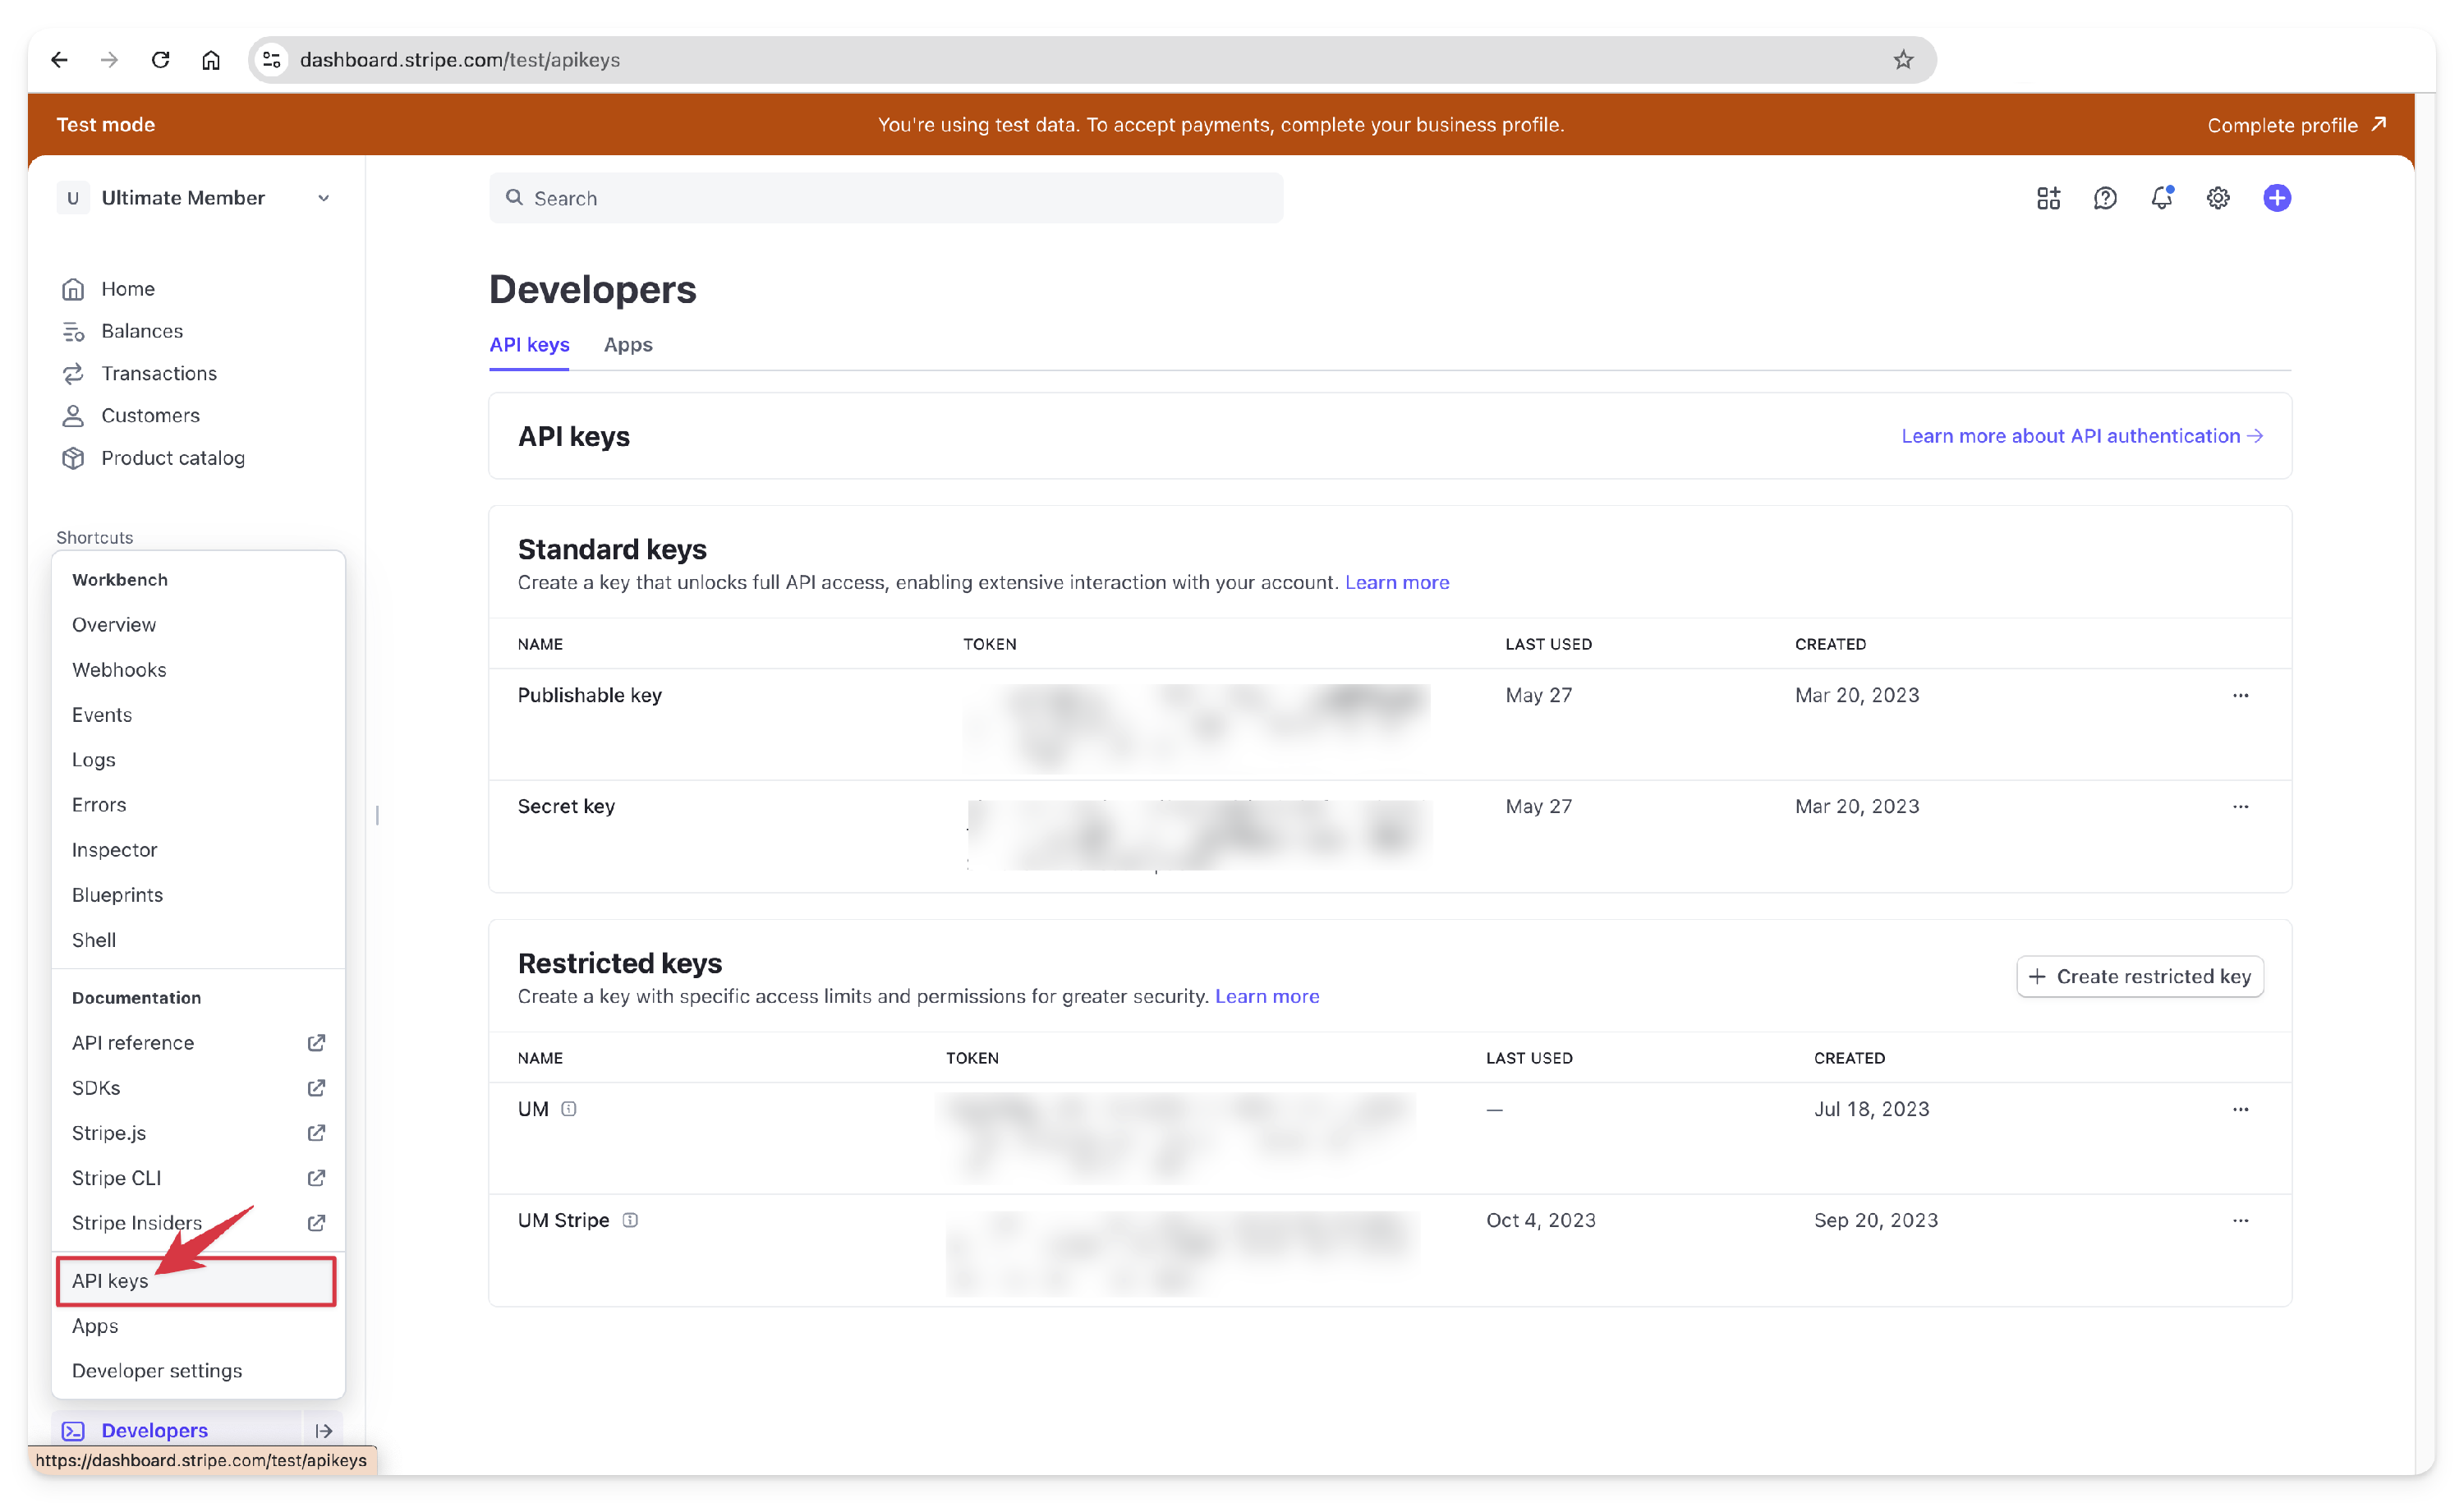
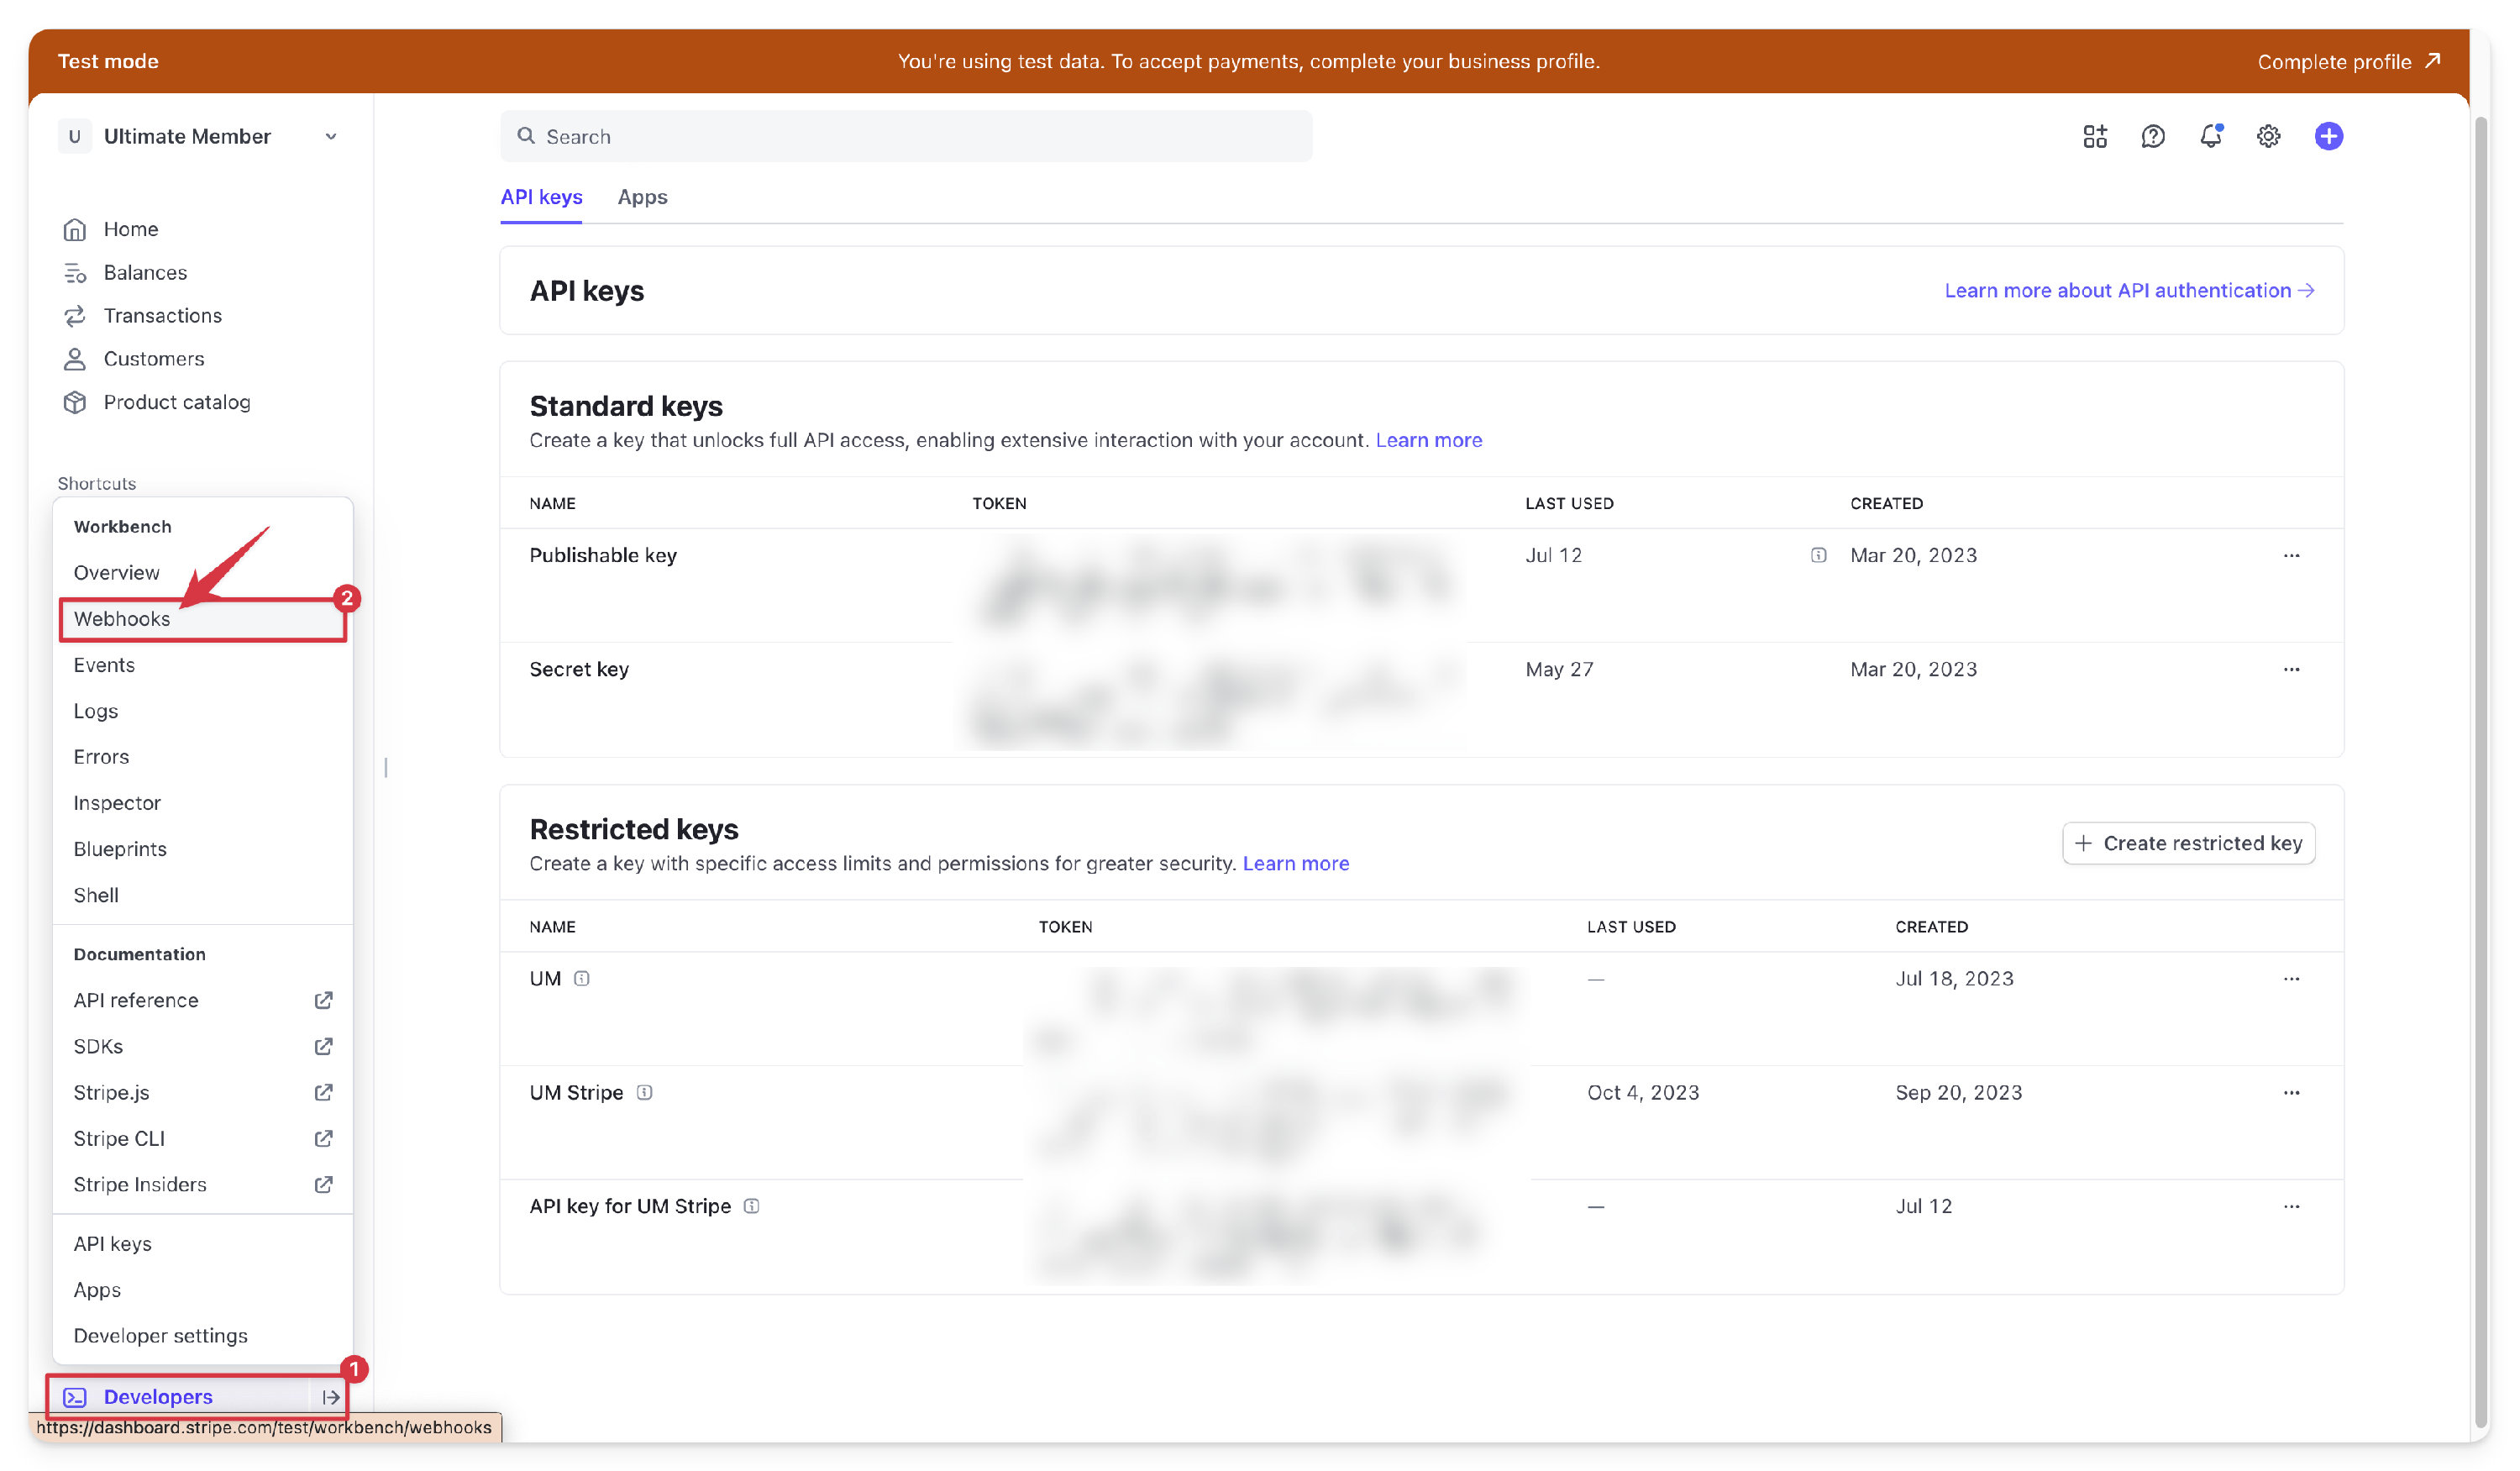
- In the left-hand sidebar, locate the Developers menu at the bottom-left of the interface and click it to expand the submenu.
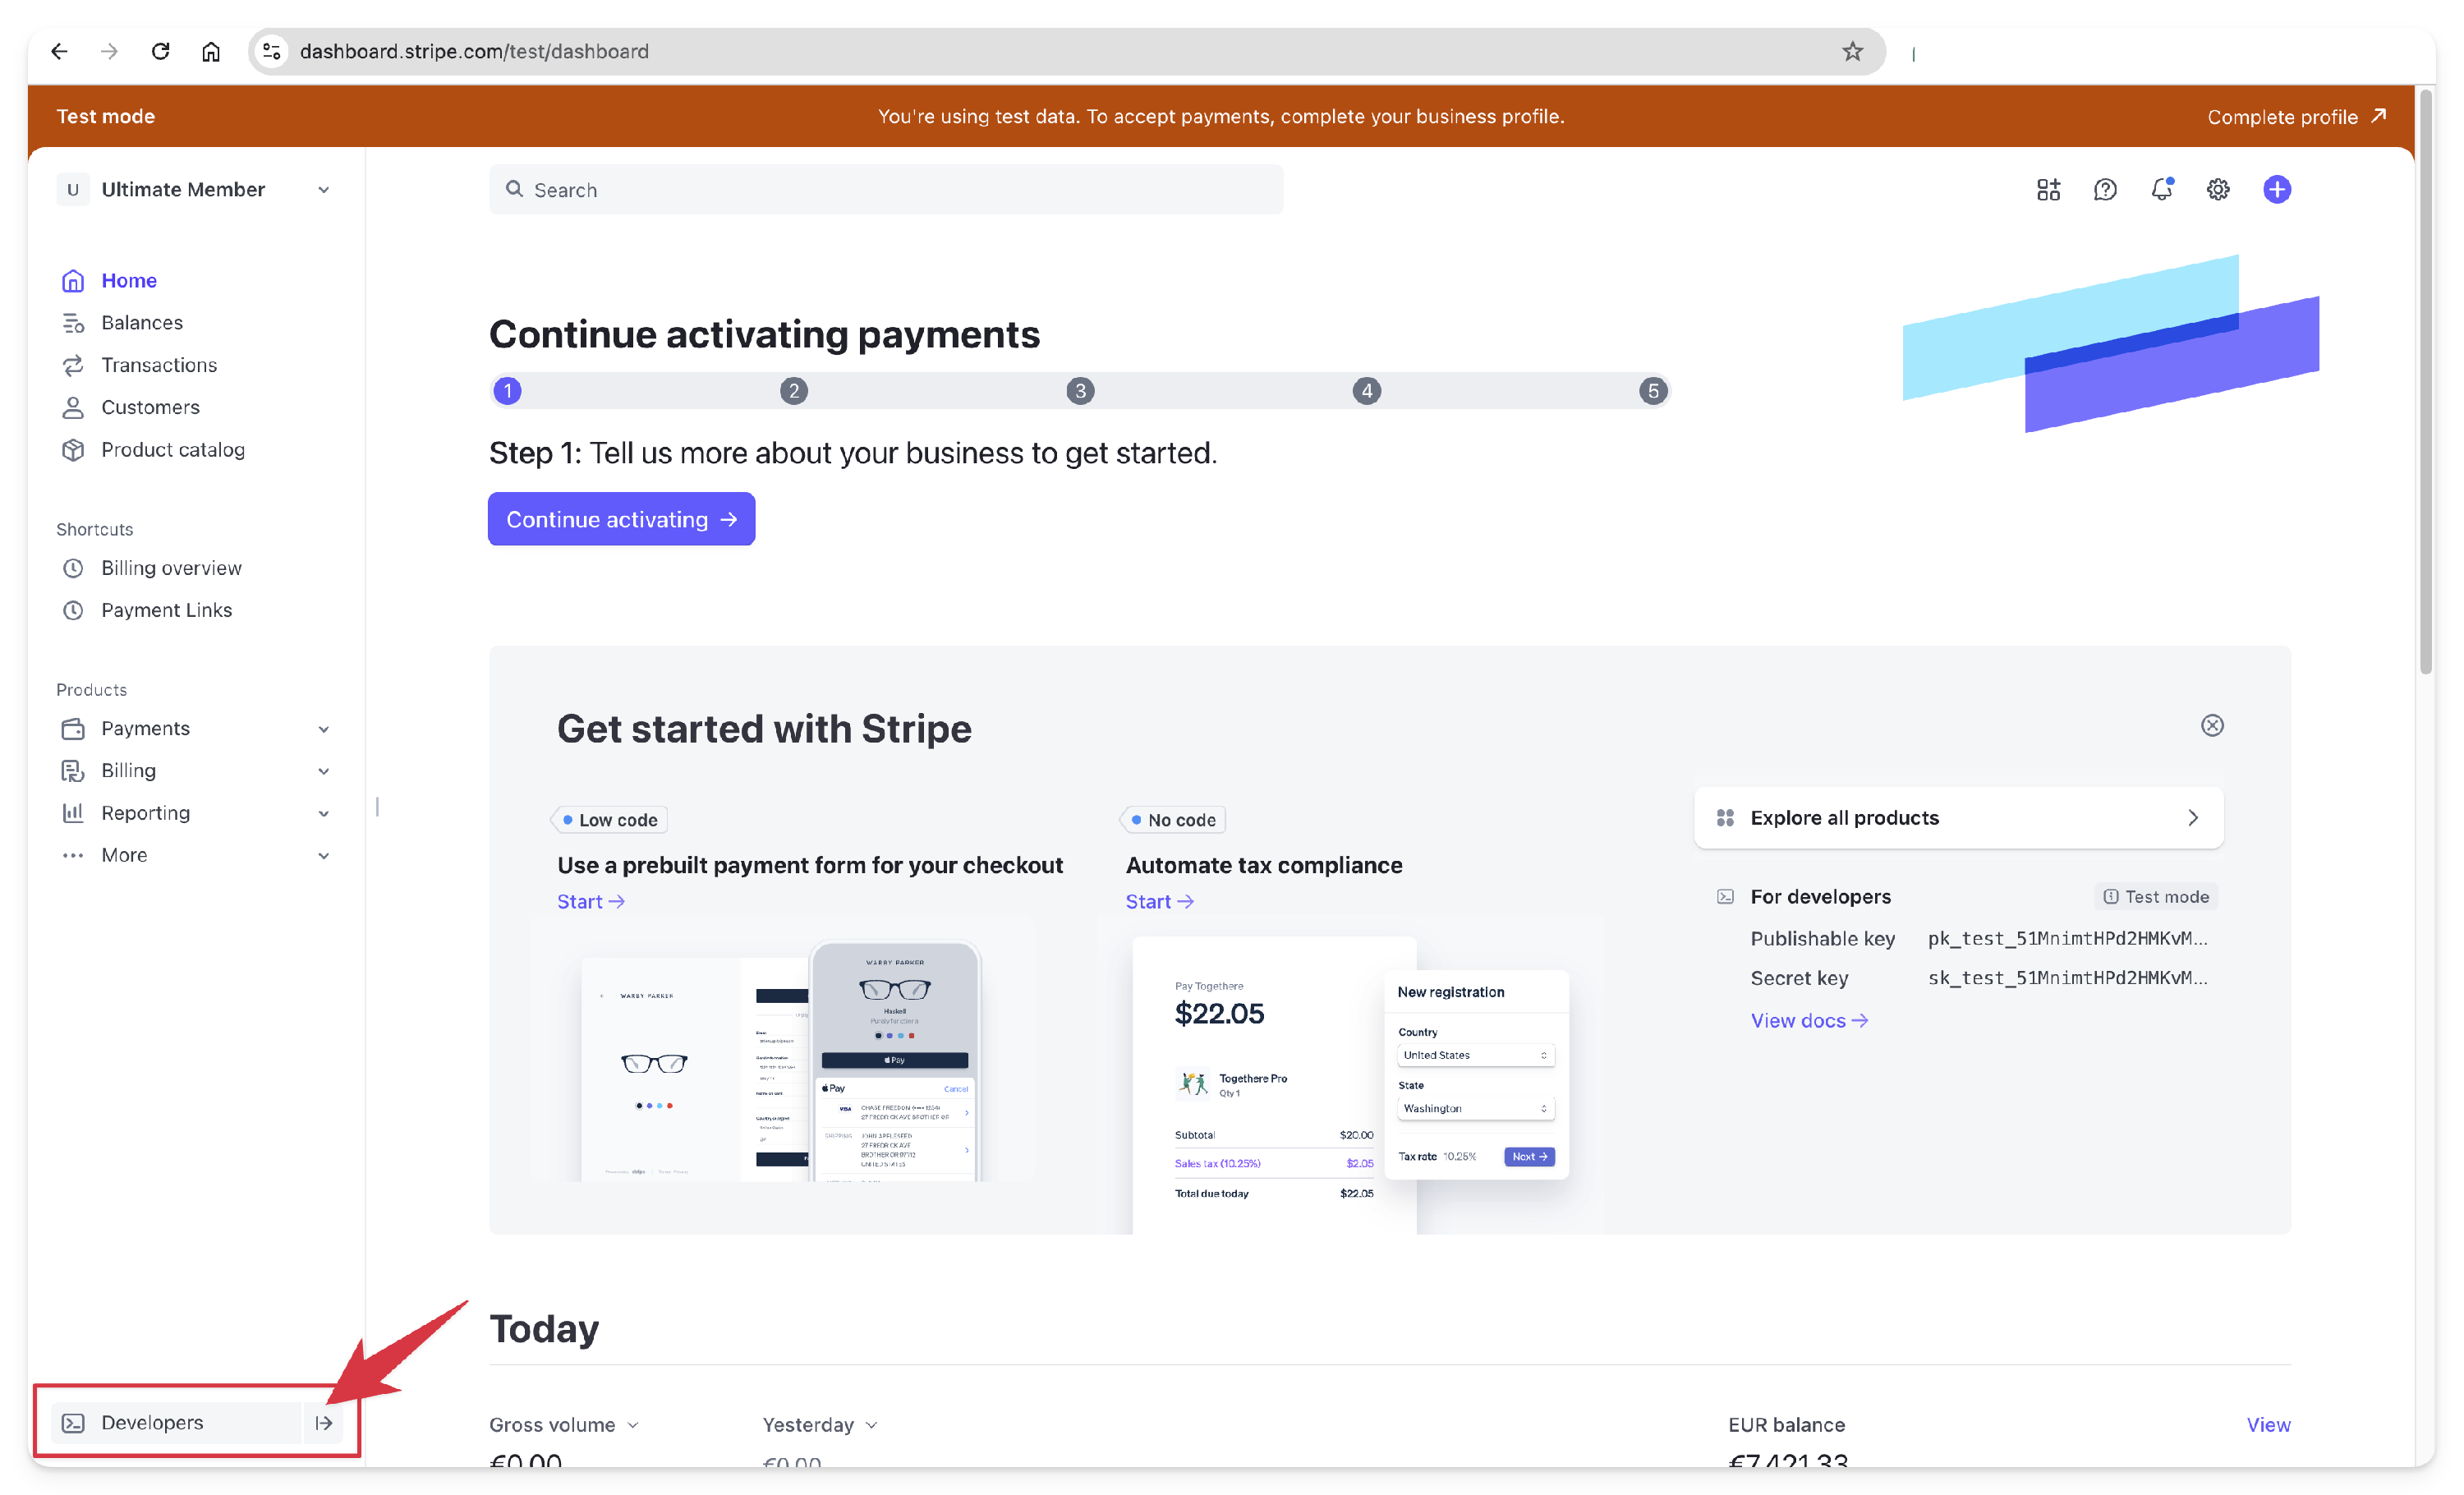
- From the submenu, select API keys. This will open the API keys page, where you’ll find both your Secret and Publishable keys for Test and Live modes.
- Copy the required keys and paste them into the Stripe plugin settings in your WordPress site: Ultimate Member > Settings > Extensions > Stripe


Note: We recommend that you use a Restricted Key for live sites and a Secret Key for local or staging sites for testing purposes. More details can be found in this article.
Key Recommendations
- Restricted Key — for use on live sites
- Test Publishable Key — for testing in sandbox mode
- Live Publishable Key — for use on live production sites
Creating a Restricted API Key
A Restricted Key offers greater security than the standard secret key by limiting access to only the necessary Stripe resources. To create one:
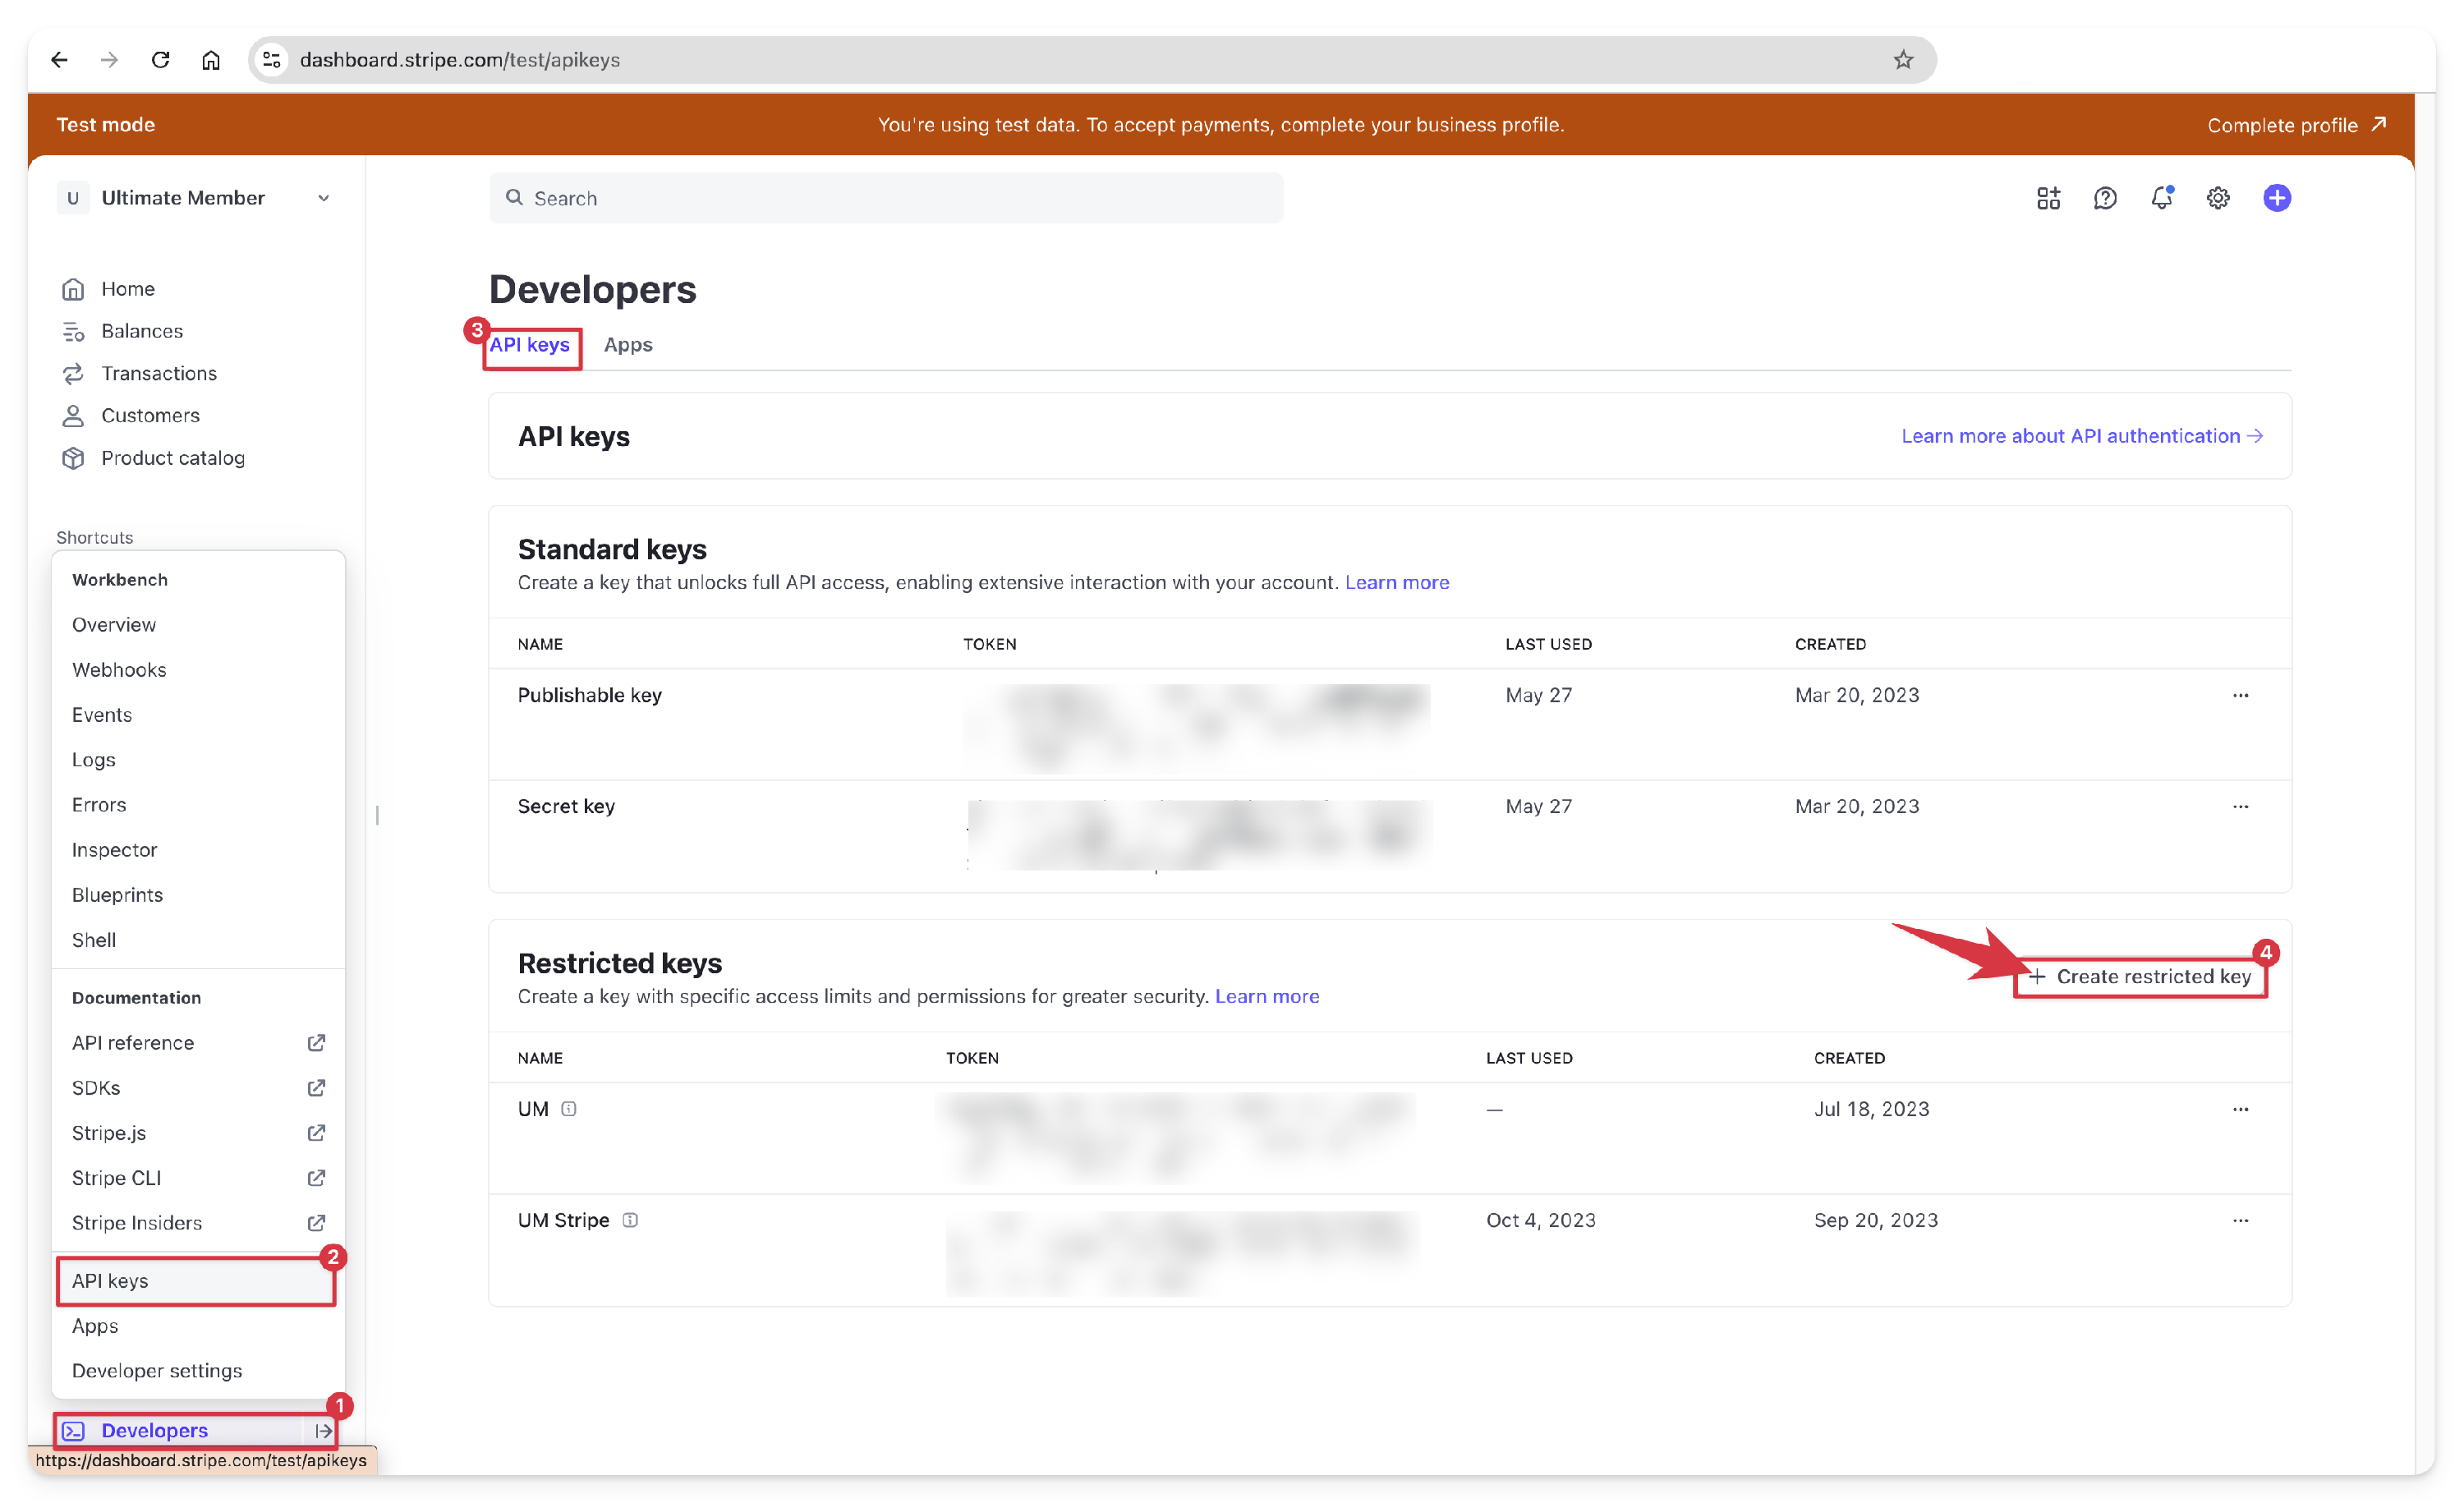
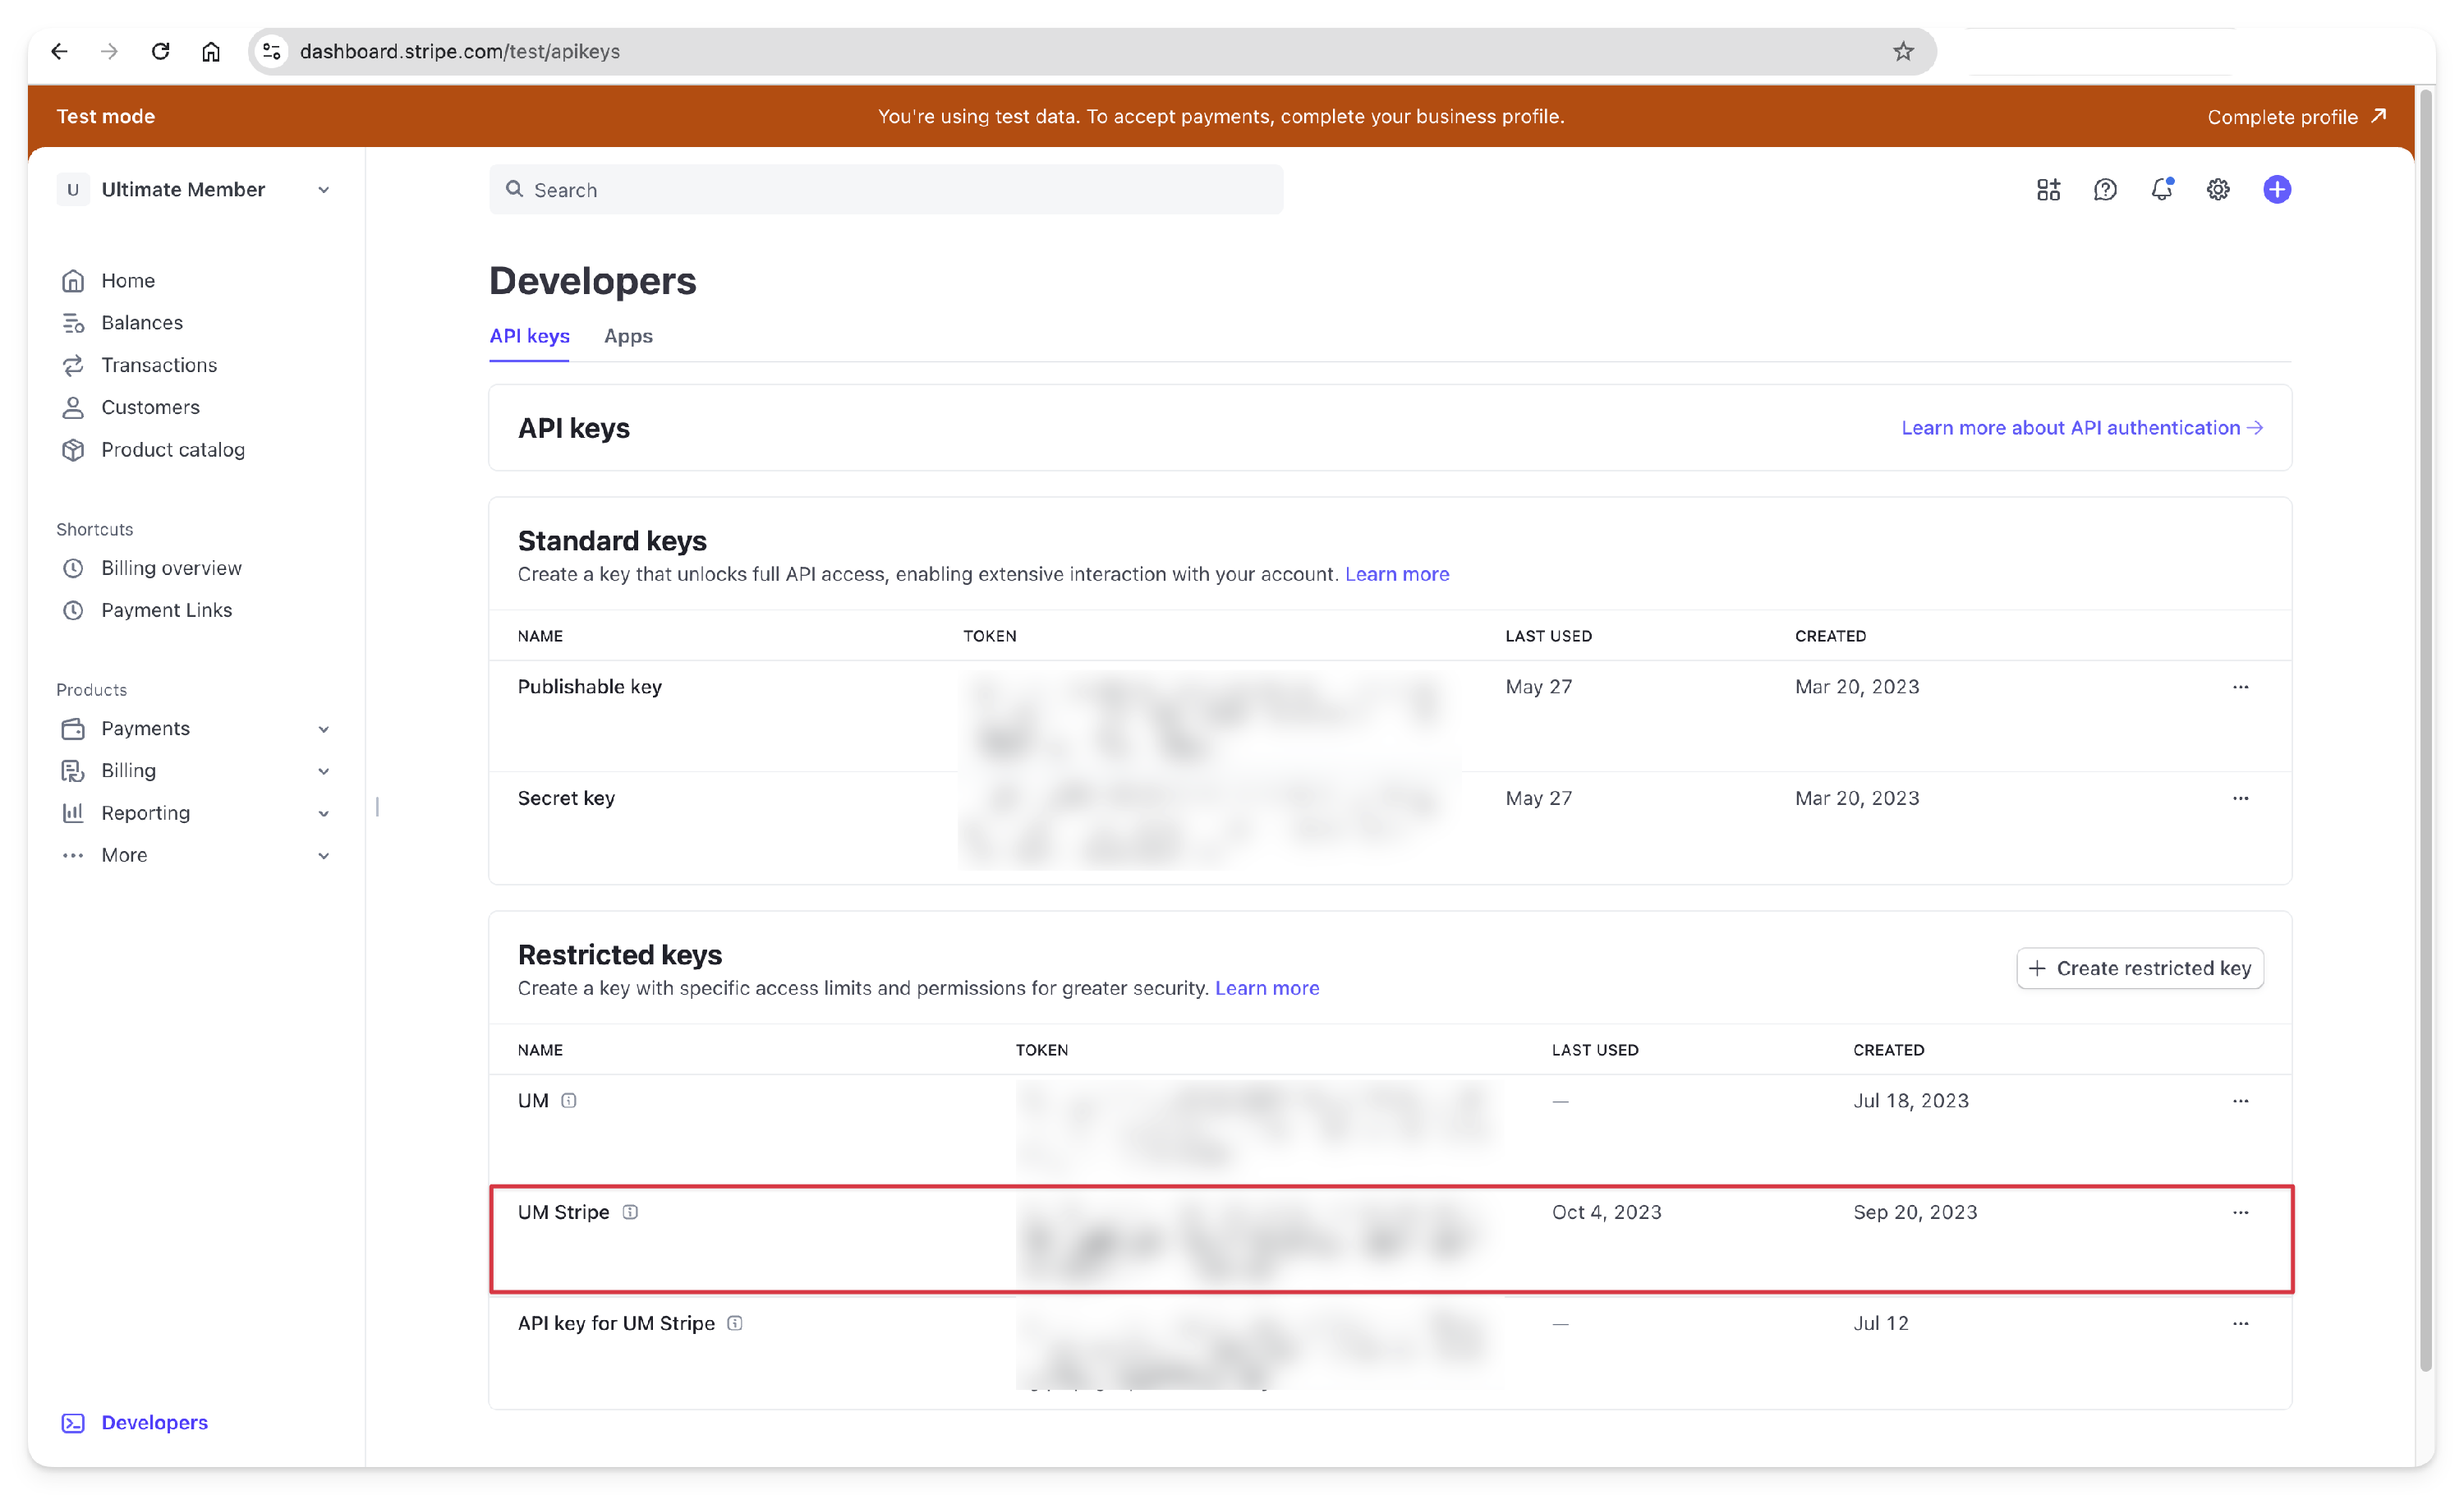
- Navigate to Stripe Dashboard > Developers > API keys
- Click + Create restricted key (or + Edit if modifying an existing key)

Stripe will then prompt you to specify how you intend to use this API key. Under “How will you use this API key?”, select: Providing this key to another website. This option is appropriate because the Ultimate Member Stripe extension functions as a third-party plugin connecting your WordPress site to your Stripe account via an API key. Selecting this ensures the key is properly categorized for external use and allows you to manage which Stripe resources it can access. Click the Continue button to proceed.

Entering Website Details for the Restricted Key
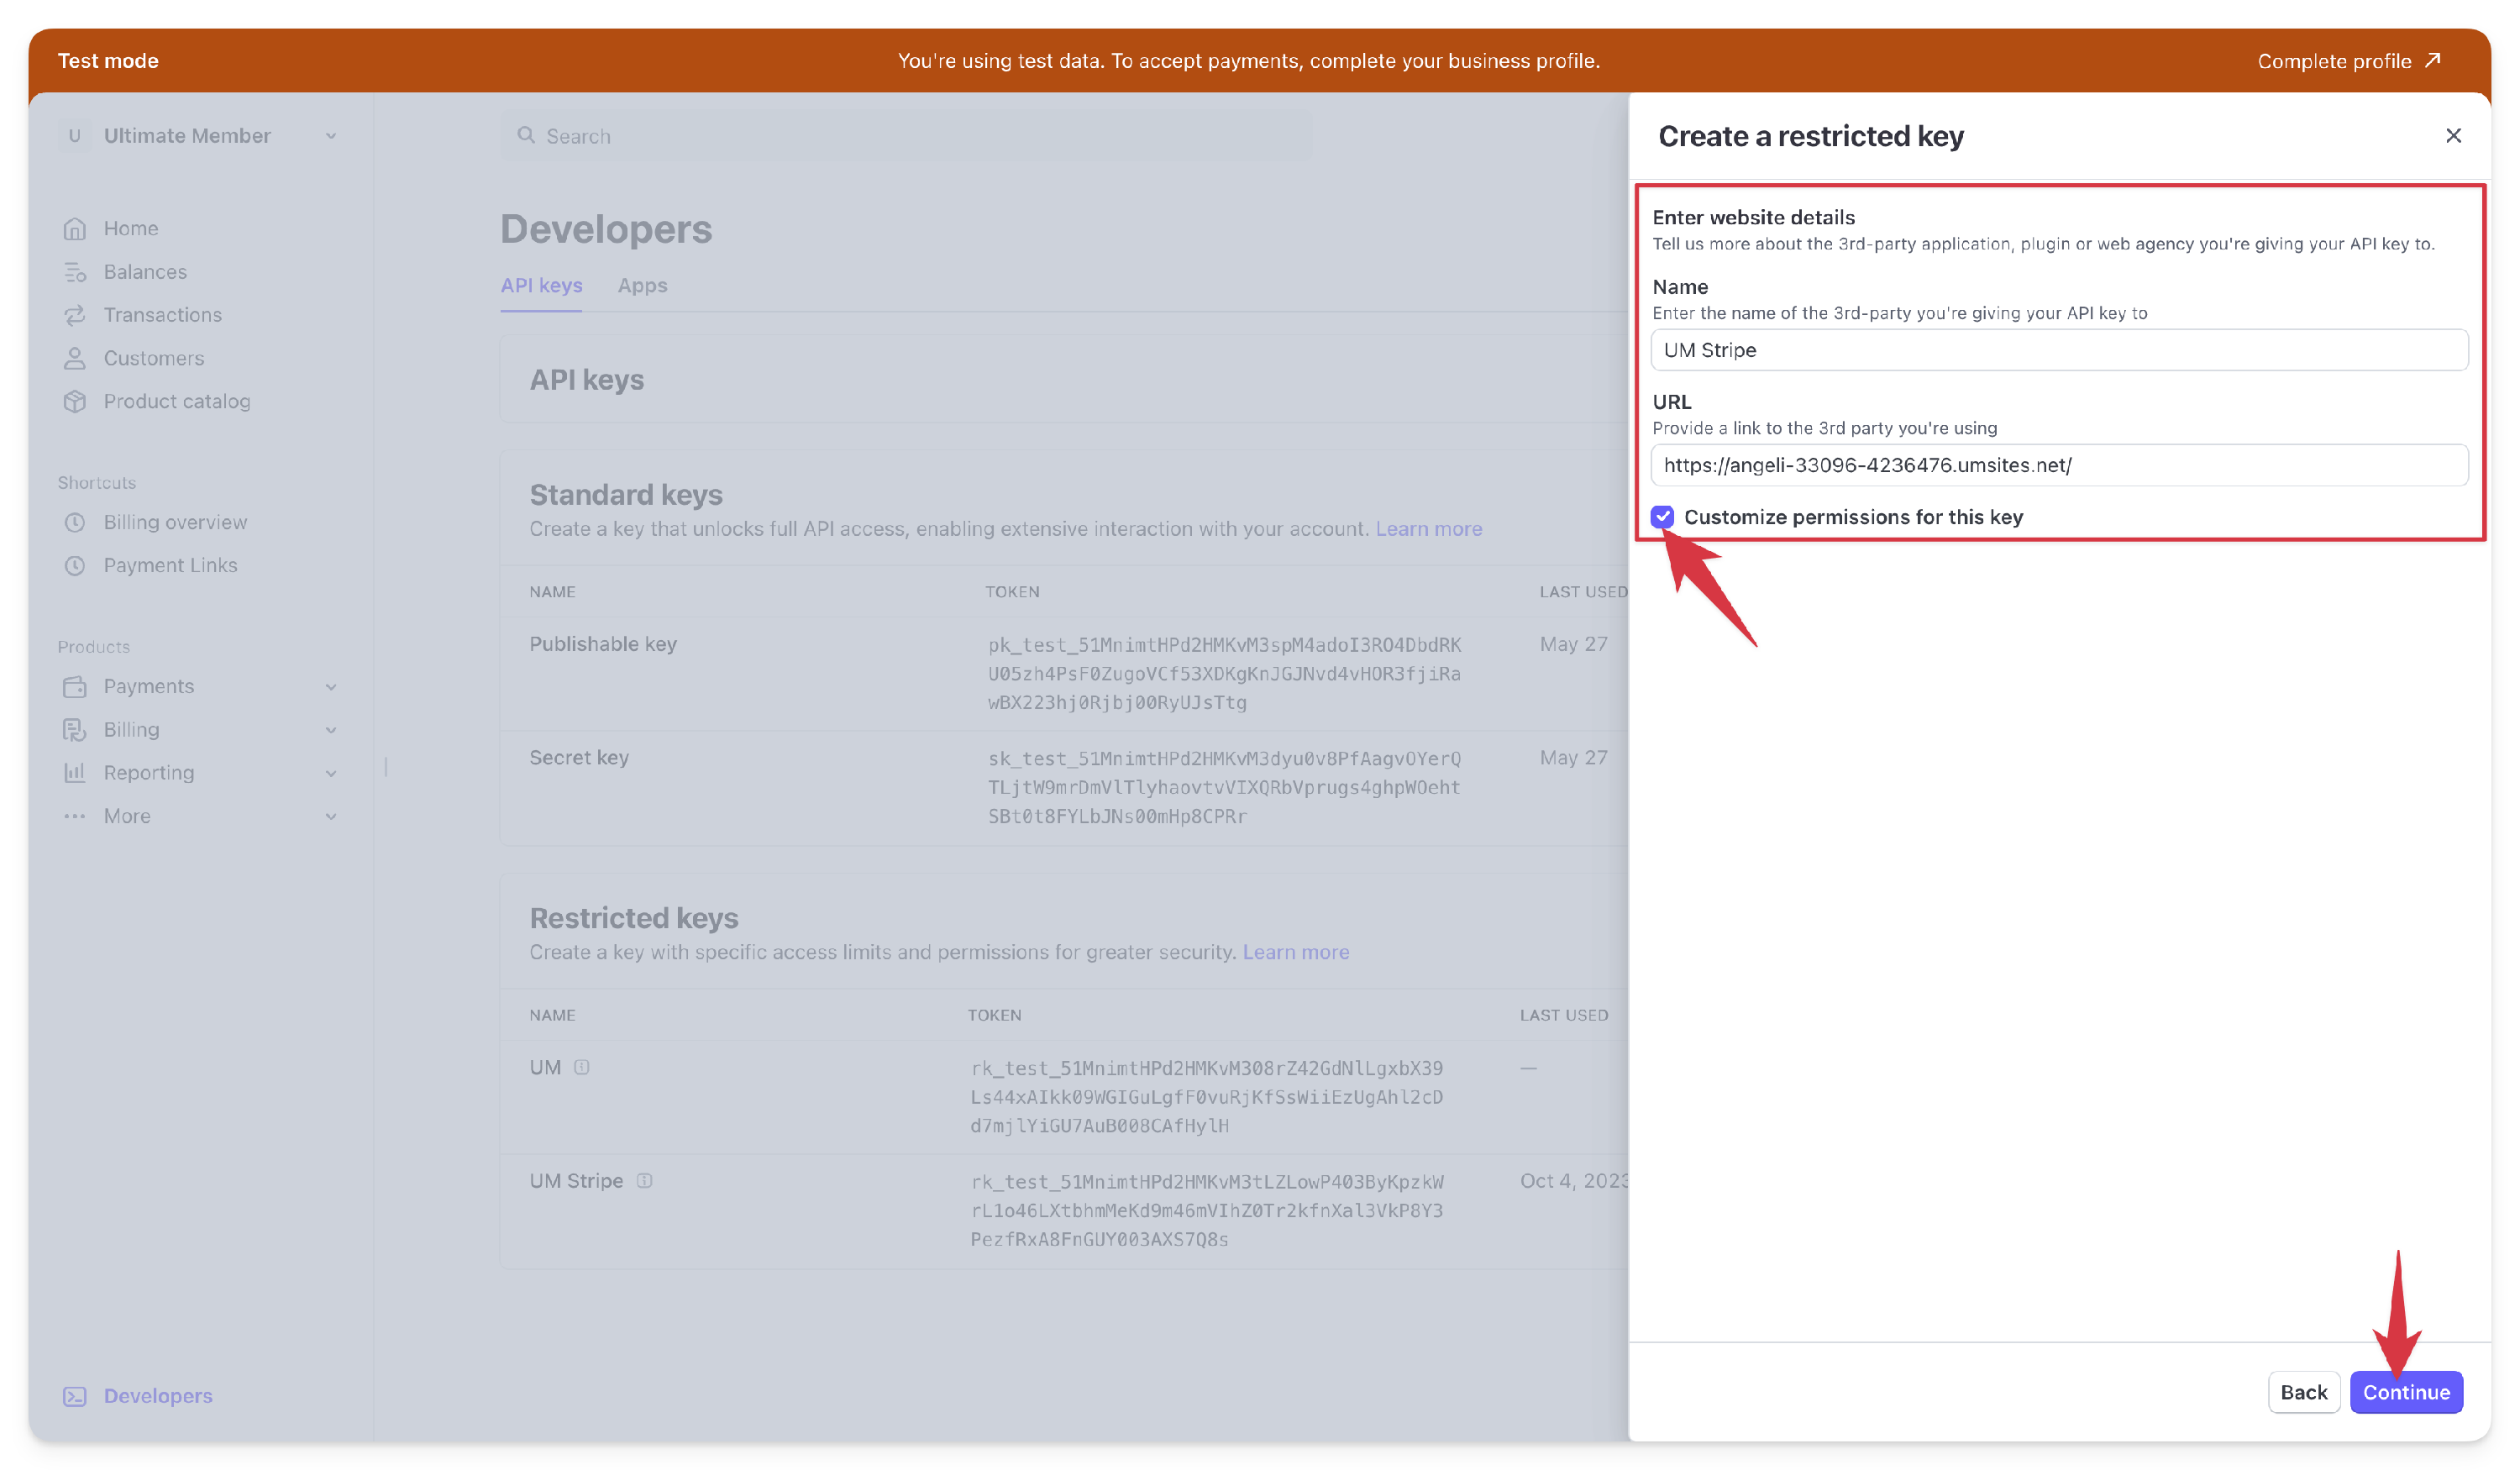
After selecting Providing this key to another website, the next screen will prompt you to enter details about the third-party service:
- Name: Enter Ultimate Member or the name of the plugin you’re providing the API key to.
- URL: Enter the third party’s website link.
- Customize permissions for this key: To enable the permissions list. Check the checkbox next to it. This will display the list of available Stripe resources you can configure for this restricted key after the continue button.
- Look for the resource types listed below in the API Keys, and configure the necessary API permissions:

| Resource Type | Permissions | Resources |
| Customers | Write | Core resources |
| Tokens | Write | Core/Issuing resources |
| Checkout Sessions | Write | Checkout resources |
| Credit notes | Read | Billing resources
|
| Customer Portal | Write | Billing resources |
| Prices | Read | Billing resources |
| Subscriptions | Read | Billing resources |
| Webhook Endpoints | Write | Webhook resources |
Once you're done setting up the restricted key, click the "Create Key" button, at the bottom right to save your settings. 
Once created, the new restricted key will appear on the API Keys page under the Restricted keys section. From there, you can view its name, manage permissions, or delete the key if needed.

Webhook
Stripe uses webhooks to communicate with your site. It provides information such as the status of the payment or subscription and is used to update the user's role based on subscription events from Stripe's side of things. This also updates the price and product details on your site when you change them on your stripe.com account.
When you check/uncheck the "Sandbox/Test Mode", you will notice the fields' labels are changing. When checked, the fields will be in test mode, if it is unchecked it means that it is in live mode.

 In the Stripe settings, you'll find a webhook endpoint ready for you to copy and paste into your Stripe.com account. When you connect with Stripe, it automatically generates the Webhook URL based on the current domain of your site and adds the event hooks to the Webhook settings on your Stripe account. More details are listed below:
- Head to Ultimate Member > Settings > Extensions> Stripe. Beside the Webhook Endpoints section is where you can copy your Webhook endpoint URL or when you have added the API Keys, Press on the "Connect with stripe" button, and your Webhook endpoint will be added instantly to your Stripe account settings.
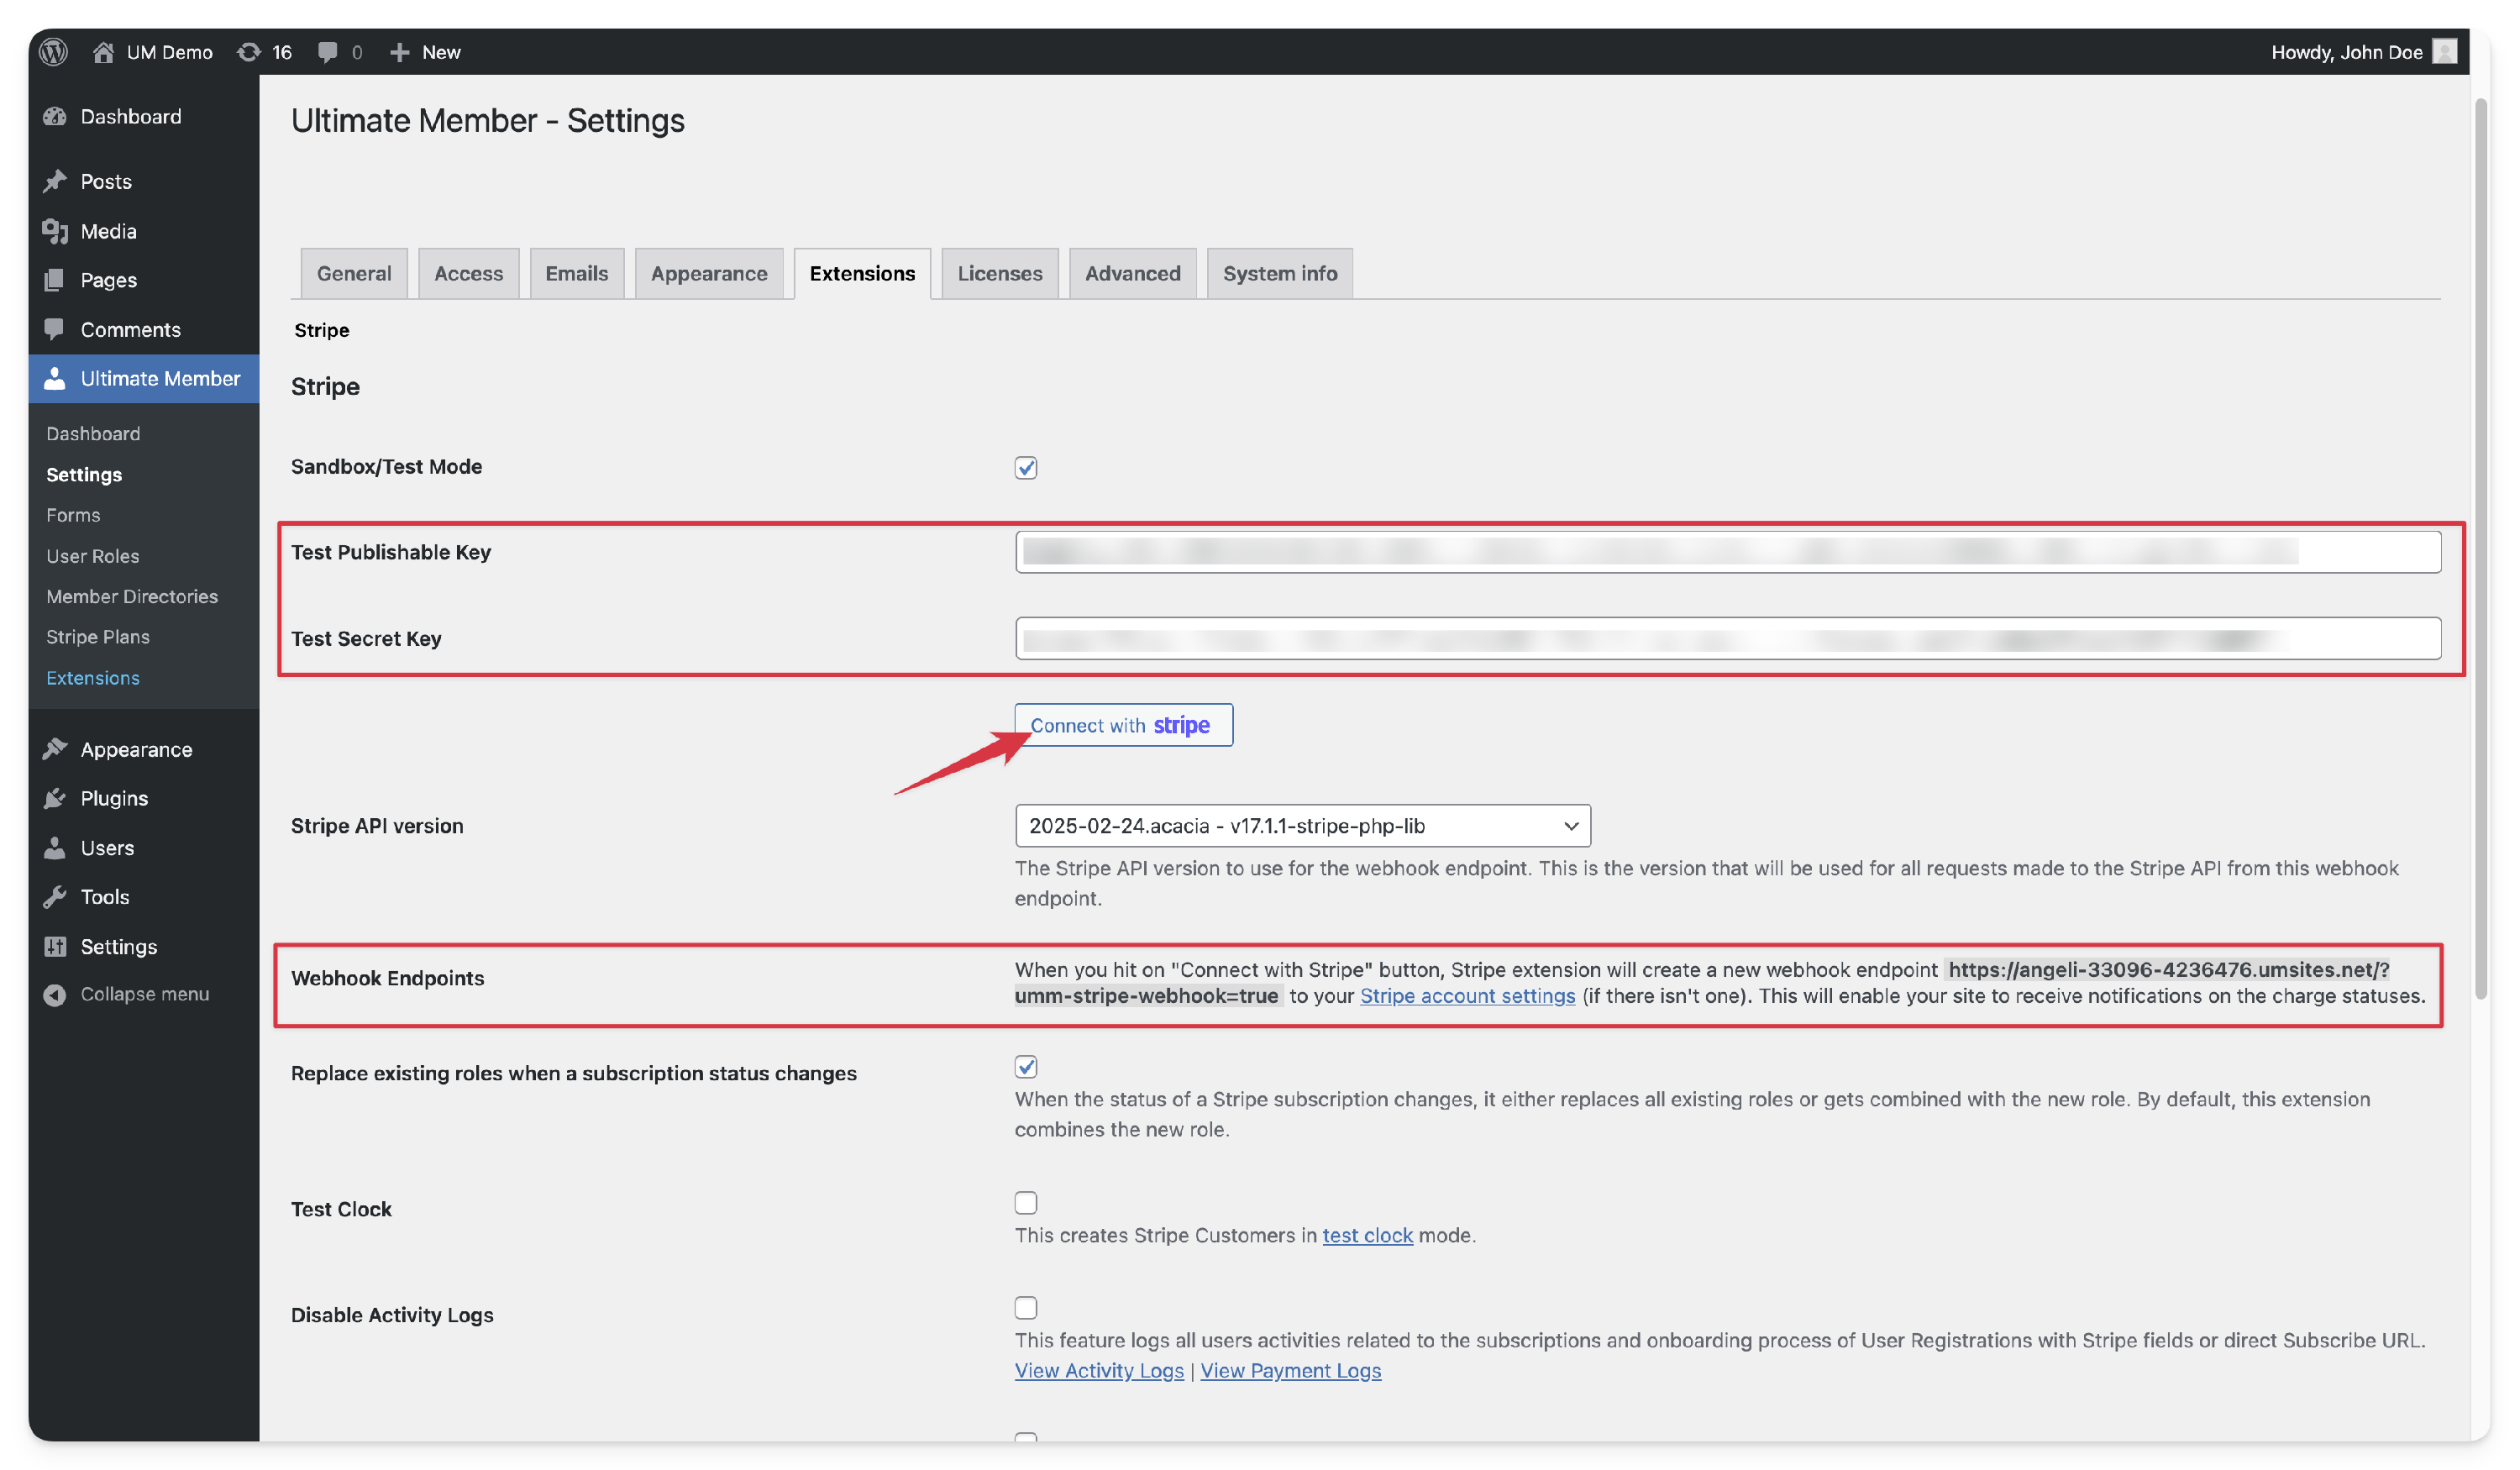
- When you try to click on the "Connect with Stripe" button, it should validate the Publishable key and Live Restricted or Secret Key. It will show an error message when they are invalid.
-
If the connection is successful, the "Disconnect Stripe Account" and "Import Prices from your Stripe Account" buttons should appear.

-
If you are trying to connect with Stripe and have installed the Stripe extension on your localhost or your own computer while using a local domain, you may encounter an error (as shown in the image below). To receive the payload or events from Stripe.com events transactions, your site's Webhook URL must be publicly accessible. It's important to note that even if you encounter this webhook creation error, you can still import pricing locally.

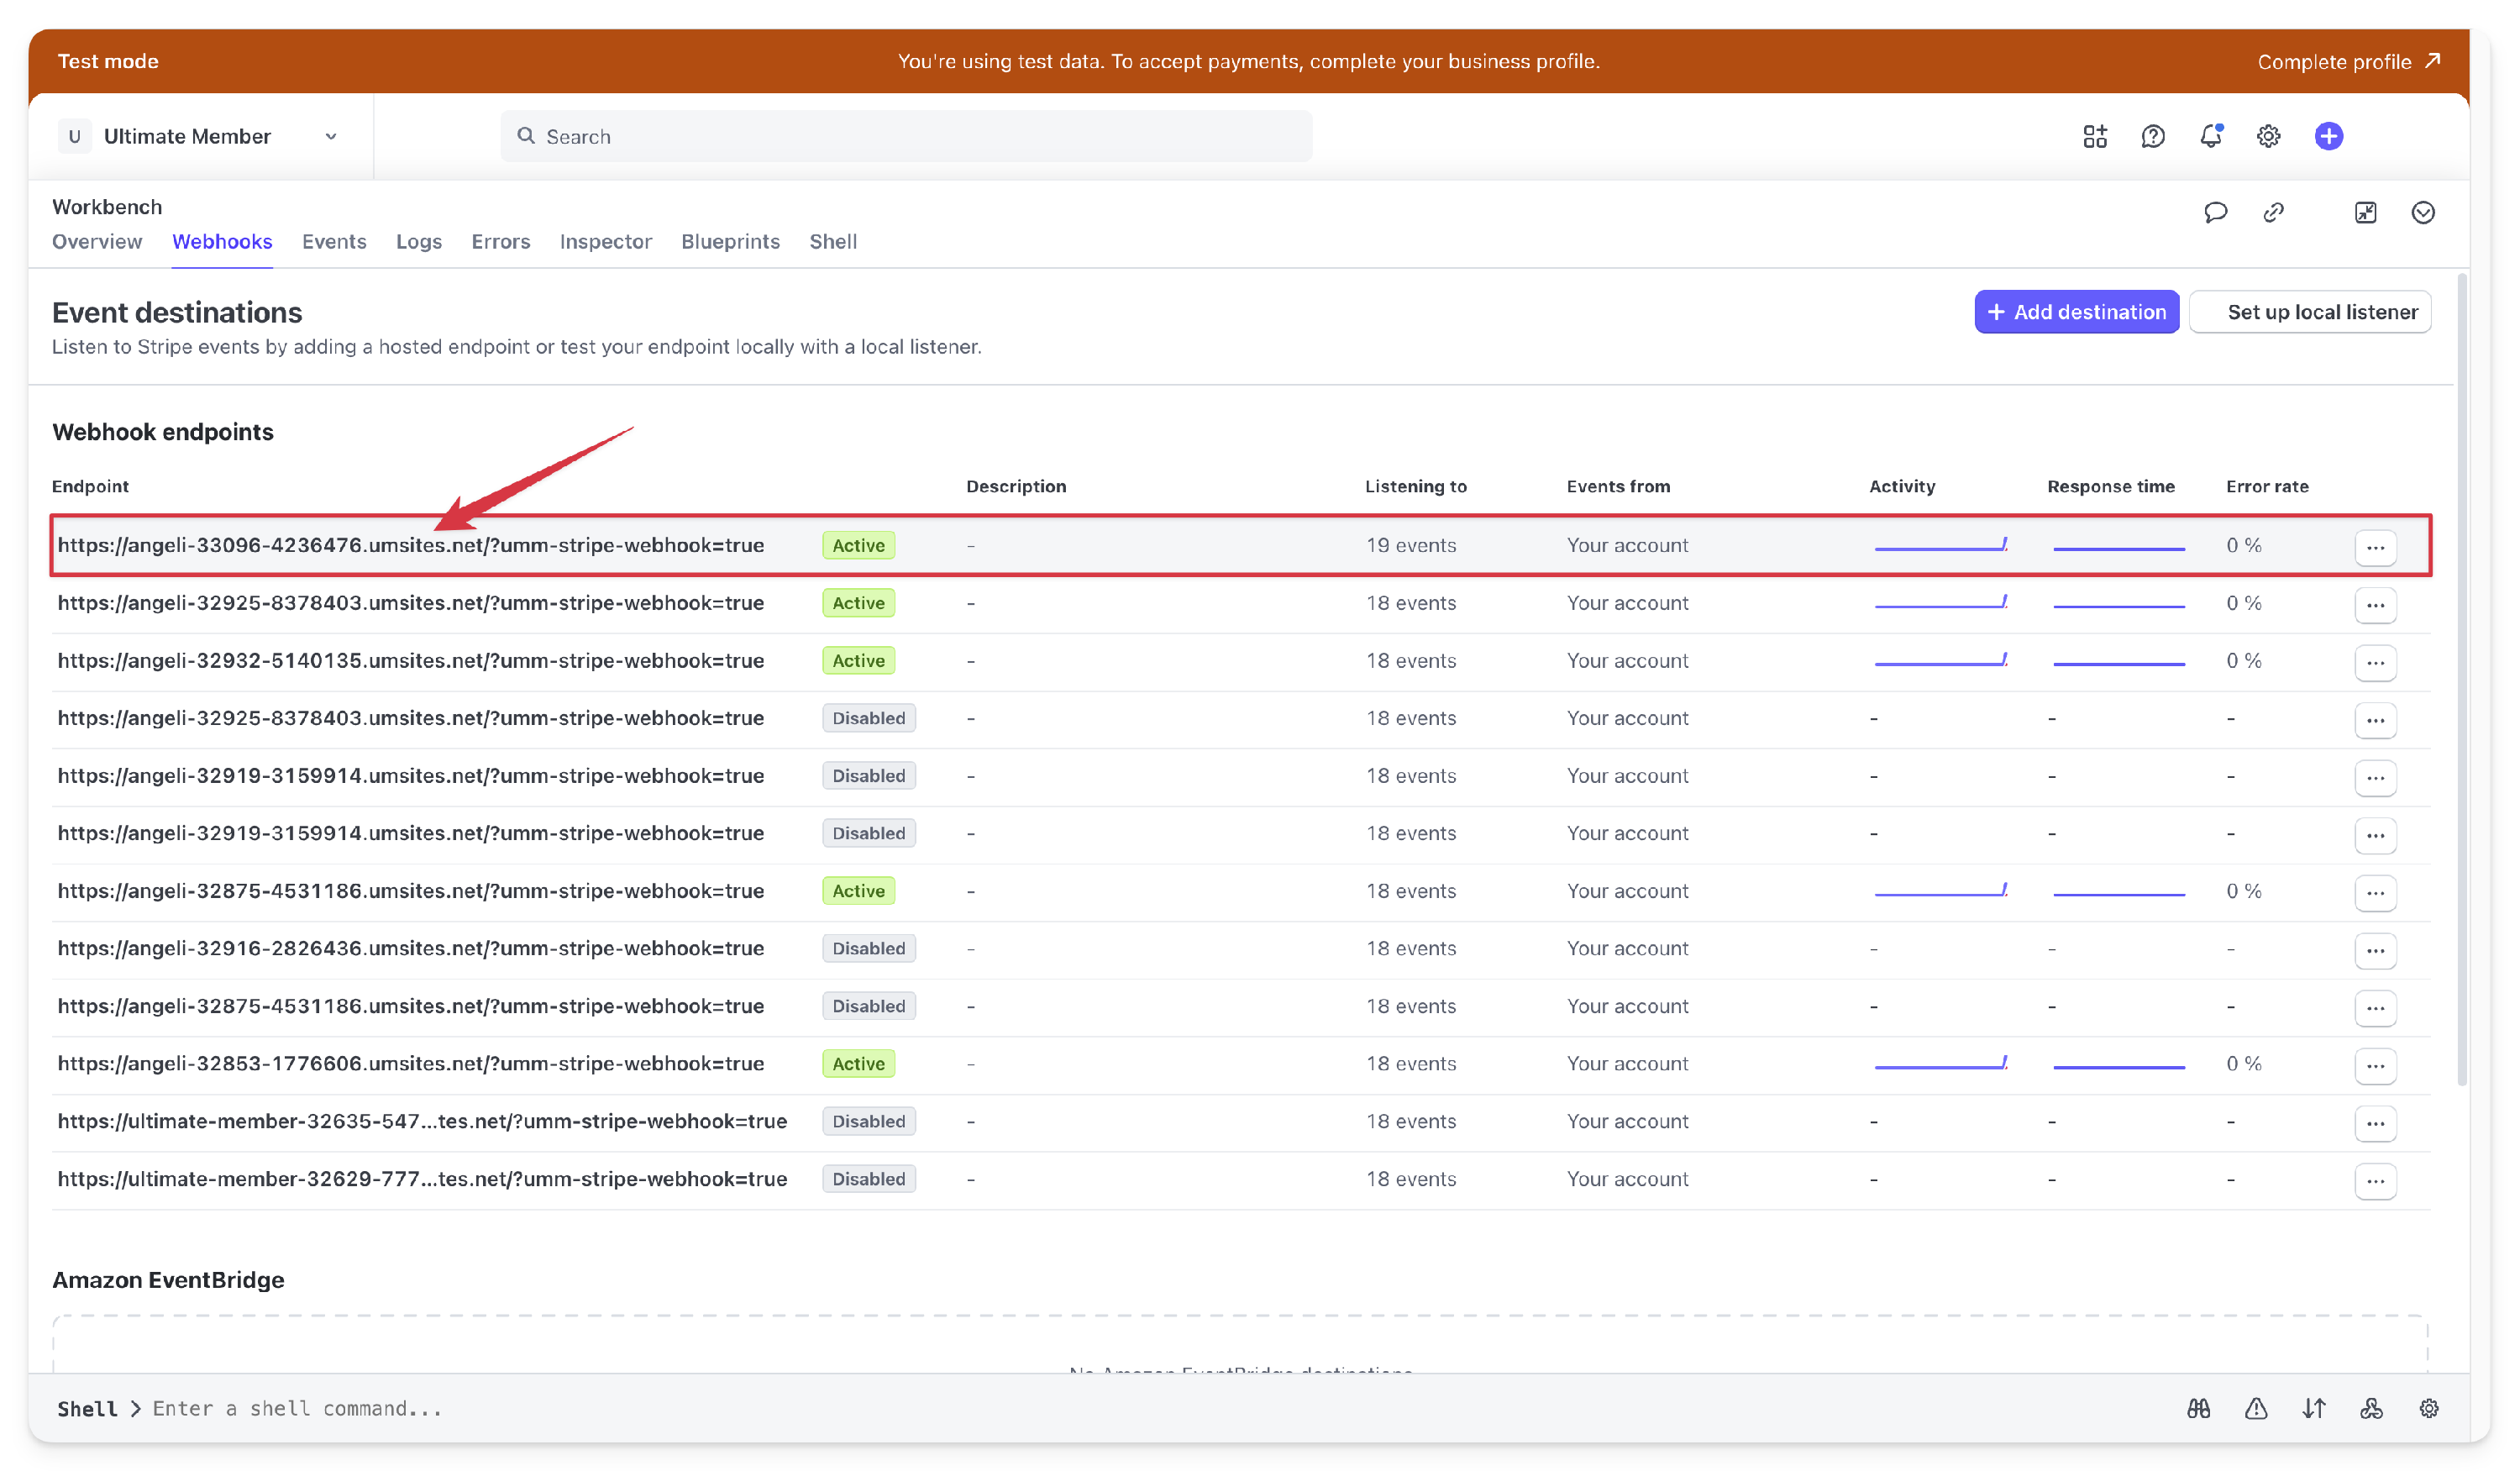
- Afterwards, navigate to your Stripe Dashboard, go to 'Developers', and access the Webhook Settings. Ensure that the webhook URL has been added to the webhook endpoint. Please keep in mind that there might be a delay before it appears, so it's best to wait a few seconds or try to reload the Stripe page
 To view these events, click the Webhook Endpoint URL. When you click the Connect with Stripe button from the previous step, the system auto-generates 17 event hooks. Starting with Version 1.5.23, five additional invoice-related events are now included.
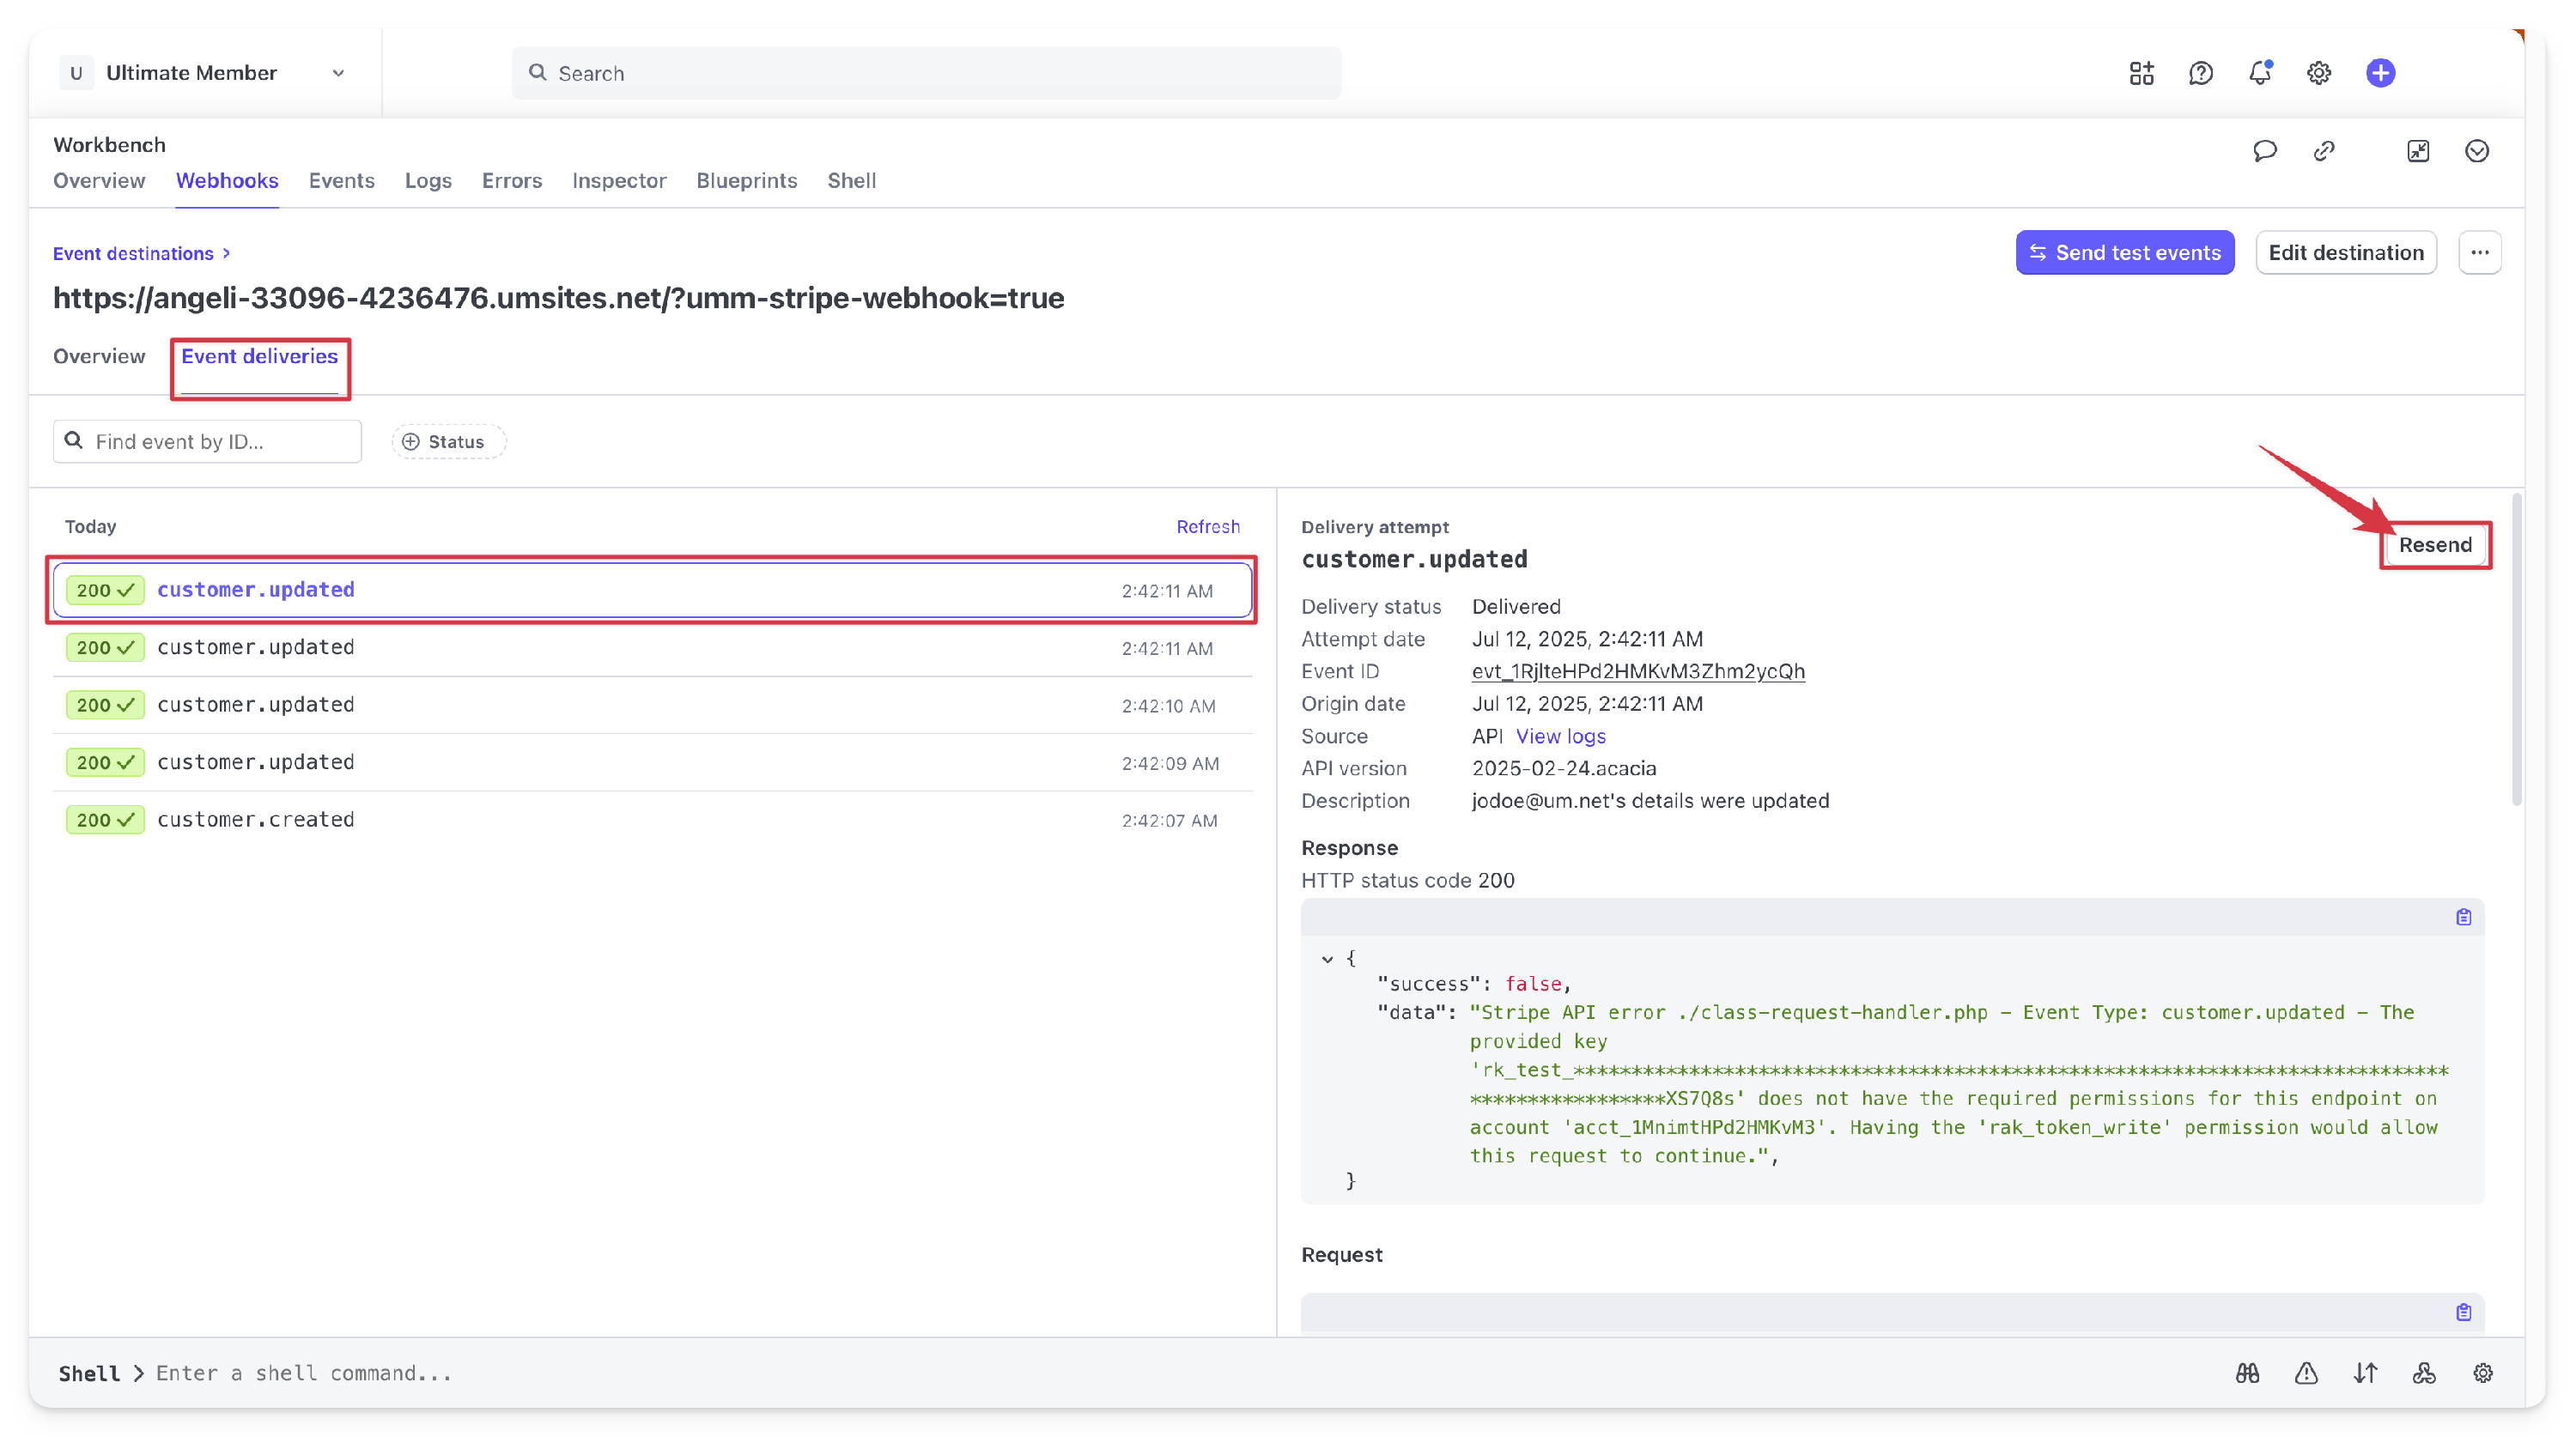
Event Category Event Hook Version Added Charges charge.expired,charge.failed,charge.pending,charge.refunded,charge.succeeded1.0.0 Checkout checkout.session.completed,checkout.session.expired1.0.0 Customers customer.created,customer.deleted1.0.0 Subscriptions customer.subscription.created,customer.subscription.deleted,customer.subscription.updated,customer.subscription.pending_update_expired1.0.0 Payments payment_intent.payment_failed1.0.0 Products & Pricing price.deleted,price.updated,product.updated1.0.0 Invoices invoice.created1.5.23 Invoices invoice.updated1.5.23 Invoices invoice.finalized1.5.23 Invoices invoice.paid1.5.23 Invoices invoice.payment_failed1.5.23 - If you encounter an error on the site, the webhook may trigger retries after an hour. If you need an immediate trigger, click the "Resend" button in the webhook settings by accessing the webhook URL through Stripe Dashboard>Developers>Webhooks> Event destinations> Webhook Endpoints>Webhook URL >Event Deliveries.
-
Depending on which you set up first, you can repeat this process for your live Webhook Secret or vice versa.


 To view these events, click the Webhook Endpoint URL. When you click the Connect with Stripe button from the previous step, the system auto-generates 17 event hooks. Starting with Version 1.5.23, five additional invoice-related events are now included.


Need Help? Encountering Issues?
If you encounter any issues with setting up your Stripe integration, such as problems with restricted keys, webhook failures, or permission errors, we recommend checking out our Stripe Extension Common Issues document. This resource provides detailed troubleshooting steps and solutions for common problems. You can access the Stripe Extension Common Issues document here.